

I got this idea off Pinterest (like so many of my great ideas), but like a lot of Pins claim, this was NOT a DIY. Have you ever run into that problem? You see a pic of a delicious cake, Pin it, come back later when you’re ready to make it and find out that it links back to a Google image or an online store? I HATE that! I’m usually pretty good about checking the link before I Pin It to my page, but this was one of the times that it slipped my mind. It looked simple enough, so I lucked out on this project and was able to recreate it the way I wanted to! While I like the style of the original that I pinned, it didn’t really match my home decor (or what I plan for my this part of my house to look like when I redo it).
I wanted to do this for my son and our 2nd child we will have in the future (not pregnant…ending rumors before they start!). We kept track of my little sister’s growth on the door frame of her closet. We didn’t think we’d ever move, but after that house being a part of our lives for about 25 yrs, my mom sold it…and there went the growth chart. 😦 I’m HUGE on preserving memories, especially in a fun way, so I wanted to make sure we could keep this growth chart no matter where we lived. I didn’t want to make it cutesie or paint it in the colors of his room, b/c I knew we’d be changing his room over the years and what 12 yr old boy wants a giraffe growth chart decorating his wall? So I decided to make it fairly neutral and match our house!
Below is the DIY for my Growth Chart! There are so many ways you can make this your own, so I encourage you to do so! Choose a different paint color, a more narrow or wider board, a different font, distress it or don’t…the combinations are endless! So let’s get started!
*TIP* If you’re thinking, my child is 4 yrs old and it’s too late to start this project at my house…REMEMBER that most Dr’s offices track your child’s growth each time you go in. Remember those well visits?! They most likely charted his growth for you. Ask them for your child’s height for each year you don’t remember! His birth “length” should be on his birth certificate!
MATERIALS

1 – 1″x8″x6′ board
primer
paint color of your choice (I stuck with white b/c I’m doing a fun shabby chic look in my entry way where this will hang)
2nd paint color of your choice (if you choose to distress yours like I did…I chose a dark brown)
paints brushes (1 for painting board, and 2 smaller for painting the hash marks and numbers)
ruler
ball point pen
hash tag and ruler guides (leave a comment with your email address if you’d like me to email you my template to print out)
sandpaper (only if you’re distressing it) (I used 3 different types…rough, less rough and a smoother…just what was on hand)
antiquing glaze and q-tips (only if you’re distressing it)
STEPS
Start by priming your board. I did 2 coats just to make sure my paint would cover evenly. Primer dries fast, so by the time I got to the end of the board I could start back at the top with the 2nd coat without waiting.

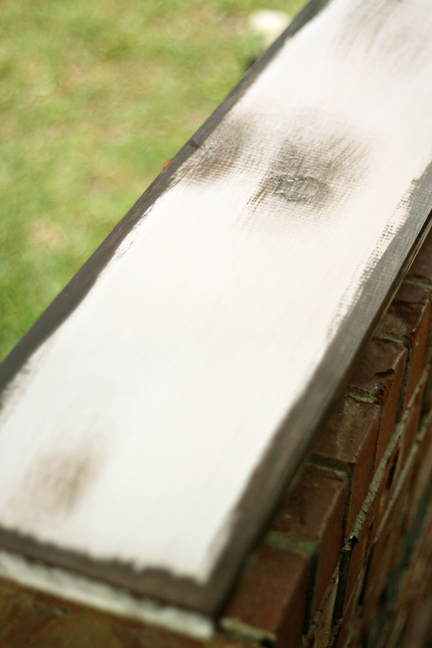
After the primer has completely dried and if you choose to distress your board like I did, paint the color you want to show through (after sanding) around all the edges. I also chose to paint a few rough spots on the board, just in case I wanted to distress in other areas besides the edges. If you are not distressing, skip to the next step.
. 
I tried to just stick with my primer for this next step b/c I wanted that flat paint look, but it wasn’t covering the brown well enough, so I resorted to using the white trim paint we already had at the house. If you would like to use a different color, feel free to do so! Be sure your undercoat you just painted is completely dry before painting your final coats…I applied 2.

*VERY IMPORTANT* Figure out how far above the floor you want your growth chart to hang, b/c you will need to start your hash marks accordingly. I wanted mine to hang 8″ above the floor, so the base of my board = 8″ which meant my first hash mark represented 9″ and should be a longer hash mark. I taped my guide on the board in the proper place.

While concentrating and measuring everything out just right, I felt something RUN UP MY LEG!!! I screamed, of course, and looked down just in time to see this fella hop off my leg and onto the drain pipe. YUCK!!! He hung around my project area WAY too long.


I managed to recover and got on with my project 🙂
Next, use your ruler to help guide your pen as you trace over your guide with your ball point pen. Be sure to press down with enough pressure to indent the wood. This is how you will know where to paint.

See the indentations? Cool, huh?! You can try to draw your guides directly on the board, but I find this way much easier.

Now comes the tedious part. It’s not that hard, but because I’m such a perfectionist, it took me longer than it would probably take most people. Start to paint your hash marks and numbers using whichever color your heart so chooses! I chose dark brown.


If you choose not to distress yours, YOU’RE DONE!!! If you want the shabby chic look, let’s keep going!
Grab your sandpaper and get to town! I used the roughest grit first and just sanded away the top layers of paint around the edges until my brown undercoat started to shine thru as much as I wanted. Notice that some of my brown got sanded away too…that’s ok, I have a fix for that!


My kiddo…isn’t he such a cute little helper? He’s the reason I’m making this growth chart…he’s growing up way too fast. 😦

Now that you have your edges sanded the way you want them, let’s move on to fixing any areas you may have over sanded. This is where your antiquing glaze will come in handy! I got this from Lowe’s for around $8 and it will go a LONG way! I’ll be posting other projects in the future where I use this again. It’s a great product to keep on hand!

Dip your q-tip in the glaze and apply to the edges where the board is shining thru the paint. Do this sparingly…you can always add more later if you want it darker. Rub it on and use the other dry/clean end to wipe it back off. It’ll give you that nice dirty/aged look! Continue all the way around until you’re happy with how it looks! 
Let it dry and then you’re ready for hanging it!

I have a ton of miscellaneous art hangers in a tool box, so I just scrounged around and found this one. Of course I couldn’t find the right size nails for it, so I used 2 small ones I could find. Excuse the horrible nail job…if I hammered them all the way in they would have poked through the front. ![]()

Don’t forget to account for the height you want this to hang from the floor and factor in the distance the hanging hook is from the top of your growth chart, so you can place the nail at the right height on the wall! Hang it and you’re ready to go!
The best part, if you ever move, you can always take your child’s chart with you!

What colors would you choose? I’d love to hear your ideas! Leave me a comment with how you would paint one for your child!
Also…let me know if y’all think I’m posting too many photos. I LOVE a lot of photos on “How To’s”, so I may go a little overboard. 😉
Lisa 🙂

OMG Lisa! This is so good! You should do this professionally! The photos are really amazing. Love the flow of the text! Oh…pink and lime green! 🙂
I do love this! I pinned it as well and plan on making one…I should probably get started soon;) I really like the colors you have gone with. They are so neutral they will go well anywhere. And I love all of your pictures!
Do you still have the hashtag and ruler templates? I’m going to make this for my nephew’s 1st birthday 🙂 Thanks! anaewall@gmail.com
Sure do! Hope it’s not too late to send. Just now seeing this comment. I’ll email it shortly!
I would love the templates?? vodomc@gmail.com
Thx! I like the step by step tutorial, thx for sharing!!
LOVE this! Going to attempt it this week. Would you mind sending your templates?
michelledehnke@hotmail.com
Thanks!
I realize this post is a year old, but if you still have the template, please please email me at lisalang704@yahoo.com. Love the way this turned out!
I love the way this turned out. I’d love to get a copy of the template. My email is lisalang704@yahoo.com. Thanks for sharing!
Can you send me the hashtag and ruler templates too please 🙂 If you still have them.
amandabisschop@gmail.com
Looks amazing! going to make this for the nursery. Can I use the hashtag and ruler template please! Thank you. sarahsarander@gmail.com
Lisa do you still have the templates? Can you email them to me? Thanks!
erika_tate@hotmail.com
Will you please email your template? Hope mine turns out as cute as yours 😉 thanks!
Danyell1479@yahoo.com
do you still have templates you can send? this is exactly what i’ve wanted to do! if so, cmarzi01@yahoo.com
Love your blog! Could I get the templates for the hash marks? Thanks! rmf003@mcdaniel.edu
Hi! I love the work you’ve done with this chart! I’m getting inspired to make my own for my two daughters. My plan is to paint the board white and the numbers alternate pink and purple to match their white furniture and favorite colors. Could you please e-mail me the hashtag and ruler templates? Thank you! Oh and I love all the pictures, it helps to see the progress; even the ones with that little fella that climbed on your leg (yikes!), so funny!
Could I please have you send your hashtags and numbers template. This is my project for this week. Thanks, Tiffany twhitet@yahoo.com
Can I get your template please?!?!?! Working on mine now and have the first layer of paint drying now. Thanks for the inspiration!
This is the best growth chart I’ve ever seen,,,,,yes please email me the template.
Ge211@hotmail.com
Thanks
Gigi.
Beautiful! Exactly the look I was looking for! After years of smudged pencil marks on the wall, this would be a perfect replacement. Would you email me the template please?
Lisa, this is PERFECT! Totally what I wanted to see. I’m so excited to do this for my baby! I think that I’m going to put my husband and my heights on it so that Jack can watch himself catch up. 🙂
Can you please send your templates? a.mulholland@yahoo.com
Thank you!
Hello! Love this, so adorable. Could you email the templates to Jarrett.37@osu.edu? Hope this is still available.
Hi!,
I loved all of your pics!!! I think I can do this!!! Could you please email me the templates?
Also, I never knew about the antiquing glaze—I have to purchase some!!!!
Thanks so much!